DIY mind flayers - another approach
Dave over at Miniature Mash-up has already done a project similar to this, where he took Heroclix 'Dominator' minis and turned them into mind flayers with a bit of green stuff.
However, over here in the UK, the Heroclix Dominator is almost as expensive as some of the official minis. How does the British DM get around this?
These Frostgrave wizards will do at a pinch, because they're robed and many of the heads lend themselves to conversion into the classic, tentacled mind flayer bonce.
You can get a maximum of four figures out of each sprue. At £8.50 per sprue, that's a little over £2 per mini, which stacks up quite well against official mind flayer minis and even most of Reaper's bathalian substitutes.
Not only that, but there are way more arms, heads and accessories on the Frostgrave sprue than the four bodies require, so that's a pretty collection for your bits box once this build is done.Let's get de-spruing! The hooded heads or the heads without too much hair on will be easiest to adapt. Poly cement doesn't glue all plastics together, but for those plastics that do react to it, there's no stronger bond. Not even super glue. The bases integrated with the Frostgrave figures are fine, but I suspect these guys will look more imposing if they're on a bigger base. Good old Das air-drying clay will fill in the gaps and hide unwanted edges.
I don't need to be too fussy with the Das clay either, because I'll finish off with by dressing the base with well-dried builders' sand stuck on with PVA. I have cheated a little bit because I really wanted this Reaper Bones… err… guy. I cannot tell you how well he fits into my campaign though, so he's made it onto the same production line as the models relevant to this video. Anyway, no other surprises here: neat PVA goes onto the base so grit and sand will stick when sprinkled on.
Looks like I already decided to add a skull as another decoration to this base, because I guess mind flayers aren't threatening enough!
As I mentioned in the duergar video, I always prefer to sprinkle on basing medium, rather than drag the still-wet PVA'd base through the sand, to prevent rucks and creases in the finished base. Sealing with a 50/50 mix of PVA and water is essential so the basing material doesn't come away mid-paint job or at the table. It's worth taking a brush and briefly dusting away any loose sand etc. from around where the mini meets the base, before sealing. I'll be honest and say this project was a massive learning experience for me. I thought I was being smart putting a blob of Green Stuff on the model's face, my intention being to divide it into four tentacles in situ. I will later regret that decision. However, having a decent, rubber-tipped colour shaper like the one shown was a big help.
It was only after a lot of modelling work that I realised that mind flayers don't have noses like you and I do. It wasn't much work to trim the appendages off, but in doing so, I disrupted the work I had already done on the face tentacles.
At some point I got experimental slash desperate and tried making some of the face tentacles out of Das clay. Now, while I won't hear a word said against Das, it's not well suited to finer detail work like this. You can see me give up in frustration…. about… here.
I resign myself to what I should have done in the first place: make the tentacles individually and add them one by one to the model's face. Even with both wrists resting on the work surface for maximum stability, that's a fiddly task.
You can just about see on this model that I've extended the cranium upwards and backwards to make it more mind flayery, so to speak. Big brains need big skulls.
It's about now when I have the best idea of the whole build: to put the tentacles on in two pairs of two, with the second pair on top of the first. This mind flayer vampire picture demonstrates what I'm trying to explain best. The mistake I was making was to put all four tentacles in a row, alongside each other. That's not how they look on a flayer, though.
If anything, the four tentacles are arrayed around a boxy, square shape in the middle of which is the creature's mouth.
If I've got any sense, I'll put the two back tentacles on first, the ones nearest the flayer's body, wait for them to harden, then put the outermost pair of tentacles on top of those.
This is me doing exactly that. With the first pair of face tentacles left to harden for a couple of hours, I can go back and put the second pair on.I'm much happier with the result and so I've black bombed the flayers with spray primer. I was… still am… on a massive Hellraiser tip when I was making these flayers and wanted to use the cenobites from the films as an inspiration for the colour scheme: Very fleshy flesh tones and shiny fetish-gear leather.
I started dry-brushing grey onto the black base, but soon decided this was a mistake. Gradual highlights do not for a shiny texture make.
For a super, all-too-living fleshy flesh tone, I base-coated the skin bits in red.
In this parade of miscreants you can see that it was too late to gouge the green stuff off some of the mind flayers where it was still in the four-tentacles in a row configuration. Ah well. I decided to plough on and get them finished anyway.
I worked up to the upper highlights via mixtures of red and flesh tones
I still have to bite the bullet and put some sort of effect on the black clothing to make it seem slick and shiny. Somewhat hesitantly I went for pure white edge highlights. Wish me luck!
To finish off the skin areas, I top it off with pure flesh tone. The chalky, pale finish the pure flesh tone leaves can be dealt with using red tone wash diluted with flow aid.
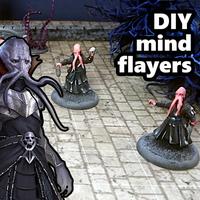
Here's the finished flayers in a suitably alien diorama. Although the weird green pillar is kind of cool, let's get it out of the way so we can have a proper look at their gribbly majesties.
I'm very happy with the way these guys have turned out, here on the left. I'll write these up as a success. These guys, not so great. They're still usable at the table, though. So these go down as an honourable failure in my book.
I learned a lot during this conversion job, which hopefully I'll take onto other projects. Maybe it will be of some use to you, too.
- Das clay, although good for large scale projects and arguably easier to work with, simply doesn't work on small scale (like, really small).
- In adapting human or humanoid figures to mind flayers, chop the noses off.
- I'm not sure when the pair one first, pair two tentacle trick will come in handy again. After all how many mind flayers does a DM need? Still, you never know. Check out the Callathiforay series if you'd like to know more about the world in which the mind flayers are due to turn up.
Until next time, insert snappy sign-off here.