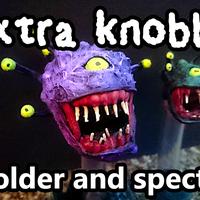
Beholder miniature craft
No crafting channel is complete without a beholder! So let's do this!
Straight off the bat I want to say thanks, not for the first time, to Frankie D Crafter but also to Wylock. I recommend subscribing to both their channels.
This build is a mash-up of Frankie's foam-then-foil-then-air-drying clay method, which is great for large to gargantuan models, in the D&D sense and also Wylock's paperclips method for beholders' eyes stalks. I'm also bringing these bad boys to the craft: these are the pearl beads I'll be using to make the beholder's body extra knobbly and 'orrible [horrible]!
You can just about see here that I've already followed Frankie's instructions and hot glued on a lower jaw made out of tin foil. What I wanted to show, here, is that when wrapping foil round a model, there tends to be a loose end. This forms a really bad base onto which to put the air-drying clay. Thanks, by the way, to my wonderful niece Nina for doing the videoing for this shot.
This is a build I did of an aboleth based on another of Frankie's crafting tutorials. I learned the hard way on this one that any flappy bits of foil need solidly gluing-down before you go any further.
Here the cocktail-stick teeth are already hot-glued in, but this is where the Frankie-Wylock mash-up magic starts to happen. I've made the first eye-stalk out of a paper clip and I've covered it in hot glue to give it thickness, as per Wylock's tips.
This is what the beholder looks like with all eight eye-stalks done.
That's the eye-stalks with beads on to form the eyes. Not sure why the hot glue gun is flashing away like that in the background. Hope it's alright.
Here's to not forgetting I'm making a spectator too! This smaller 'beholder-ling' only has four eye-stalks.
This stuff is great! You can hear me singing the praises fully of DAS air-drying clay in my shark build video, which is also available in German.
[see "Betrachter und Zuschauer Bastelprojekt - extra KNOLLIG!" in YouTube]
Here are the jaws of the full-sized beholder with Das on. The grooved, sort of, strip on the side here is going to be a band of muscle for bringing those evil jaws crashing together.
This is a really bad idea, don't do this! I thought I was being smart mixing the beads I want to use to make the beholder all knobbly together with the Das before covering the model with it! All that happens is you end up with an almighty mess, particularly if you mix water in as well, which I thought would make the mixture go on smoother.
A fair old bit later, I've sorted out the gungy mess. I made the knobbly skin by doing what I should have done in the first place:
○ Put a smooth layer of Das clay on the model.
○ Pressed beads into that skin.
○ Blended the Das onto the beads where the two meet.
Anyway, the base / flight stand is a spare piece of 3mm MDF I had, plus a piece of clear tubing I got from my sister's fella (thanks Doc). The two stalagmite / fang looking things are from a Halloween necklace thing I bought whilst I was in Dresden earlier this year.
Here I've put a few more layers of Das clay on to build up the lips and give our horrible friend some eyelids. And I've worked out that turning my smartphone on its side means you get landscape video much better suited to YouTube. But the face of the beholder still looks a bit boring compared to the knobbly bits on the rest of the head, so let's tackle that.
This third-party 'No more nails' stuff always makes me laugh: "no nails required" indeed! By the way, by this point I'd used well-dried builders' sand to cover the un-decorated bits of the base.
I've daubed the nails-unnecessary, or whatever it's called, onto the beholder face just using my little finger. It's quite viscous stuff, so the way the compound has formed peaks when I pulled my finger away is just what I was after to texture the face.
Great, let's prime the model.
Gotta mask that transparent stalk, though, so it remains see-through after spraying all over with primer. With hindsight, I think masking tape would have been better. Sticky labels are good, too, and if they're too sticky and you think they'll be tricky to pull off, you can stick them to your forehead and your skin's oils will counteract the adhesive just enough.
Black bombs away!
Here the mask has come off. I'll have to get some brush-on primer to sort out where I over-did it with the mask, but spray-priming usually needs that kind of touching up.
Straight in with the base coats. There's a shop near me sells these craft paints dirt cheap: 79p for a bottle much larger than your Vallejos etc. Obviously not what you want if you're gunning for a Golden Demon award, but I just want this table ready.
The dry-brushed highlights are just the base coats plus a bit of white. Washes will take care of where it looks a bit too pastel-like.
Some footage post-washes and also with the eyes done.
Wasn't quite happy with the eyes, but some watered down green wash took care of that.
I haven't forgotten about you, Mr. Spectator! Looks like I learned my lesson about foil not making the best mask for transparent bits.
Base coat and first dry brushed highlights. Pretty sure I used these colours for the spectator's body.
No shame in just using a Sharpie to do this black-work on the stalk's eyes! It'll mean there'll be a nice, crisp edge where the stalks meet the eyes.
Eye base coat and basic highlights. Same colours as I used on its beholder big brother.
Army painter red tone on the gums just to make them richer and more life-like.
Sand-colour and Army Painter strong tone were good for the teeth. I went back with some pure white just to bring out the tips of the teeth. For the pupil of the main eye, I did that weird horizontal slit thing that goats have to make the spectator look extra freaky.
So there you have it, credit again to the two crafting giants upon whose shoulders I stood for this build. There were just enough new ideas in this video, though, to make it worth making, I think.
Thanks for watching, insert snappy sign-off here.
If you'd like to know more about the campaign where the spectator and beholder are due to show up, check out the Callathiforay series.
[search YouTube for "Callathiforay"]