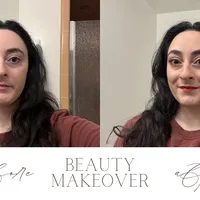
Do a Full Face of Makeup With Me
Hey everyone. This is Aliyah with
English Sponge. Today, I'm going to put
on a full face of makeup. So, come and
get ready with me.
» [music]
» Welcome back to my beauty series. Today,
I am going to be putting on a full face
of makeup. I'm going to do a complete
face of makeup using all of the makeup
products that people use on their face.
Some people wear a little bit of makeup
every day. Some people wear a lot. I am
going to be doing a full face which
includes a lot of different makeup
products. I don't wear all of these
products every single day personally.
But, I do wear them on special occasions
when I want to dress up a little bit
nicer. I will do this type of makeup for
that type of reason. A birthday, a
holiday, a party, not for every day.
But, [snorts] something really
interesting about makeup is that you put
it on in layers. And there's different
products for every single different part
of your face. And so, I thought that I
would have you join me while I put on a
full face of makeup. So, to start, you
have to prepare your skin. This is
called skin prep. My skin is dry. I need
to put on something hydrating
on my face
first so that the makeup on top doesn't
look dry. It needs to be
hydrated. So, I have a product here
that's like a lotion or a moisturizer
and it's going to make my face hydrated.
It looks like that.
Okay great.
So, you might not be able to see much of
a difference, but my face feels a lot
better. Next, I'm going to use an eye
gel just for the area around my eyes.
This is an area of the face that a lot
of people complain about their makeup
not looking good
after a few hours.
And so, if you hydrate the area really
well,
um it can prevent that problem.
All right, now my under eyes are super
hydrated. The next thing I'm going to do
is I'm going to clip my hair back.
This will keep
the hair out of my face
while I do
my makeup.
Okay.
The first product we're going to use is
a skin tint.
This is my skin tint. It's very similar
to a foundation. Basically, what it does
is I put it on all of the skin of my
face and it evens it out. It makes it
look like the same color. So, right now,
I have a little bit so of some red spots
here.
The skin around my eyes is a little bit
looks a little bit tired. Um this is
going to help sort of even everything
out so that it's not as noticeable and
my skin just looks healthy and one
color.
And for this, I'm going to use a brush
to apply.
So, I take the product and I just put it
directly on my skin and then I take the
brush and spread it around.
I'm patting
the skin tint into my skin.
And you can see it's not um
a big change and that's because it's a
skin tint. It's very thin.
Um it doesn't have a lot of coverage.
Other products have a lot of coverage.
This one looks really close to my normal
skin.
Now, we're going to try to cover up this
redness here.
And I'll keep spreading
the product around.
And so, that covered the redness just a
little bit, not a lot, just a little
bit.
I'm going to add a little bit
more and focus on that spot.
Okay. So, that helped a little bit. Now,
you can still see that there's There's
something there, but it's not as
noticeable and it's okay. I like doing
my makeup like this. I don't need it to
cover everything perfectly. I think
makeup is just to enhance your beauty.
You don't have to cover it up.
You can see that
the shade of the
product is a little bit different from
my skin
until it's
completely blended in.
Little bit on the nose.
And then you take it down your neck a
little bit, too, so that it doesn't look
like your neck and your face are two
different colors. You want them to look
the same.
So, you probably noticed that I avoided
my eyes, and that's [snorts] because I'm
going to use a different product around
my eyes. Around my eyes, I'm going to
use a concealer. Now, this is thicker
than foundation, thicker than skin
tints, and you only use it in small
areas because it can be really thick, um
and you want to choose some specific
areas to use it. So, most people use it
under their eyes,
on their eyelids.
I have a lot of redness and darkness
around the eye that I want to cover up.
I'm going to put a little bit more on
that red spot.
It's a little red spot here. So, I
didn't use very much. I just put a few
dots where I want it to go.
And now I'm going to take a smaller
brush, and I'm going to blend this
concealer in
with a tapping motion.
So, now that's even less noticeable.
I'm going to go under my eye
and spread that color out.
In small taps I'm doing this.
Do you see the difference between the
two eyes?
Let's make this one match.
Now I'm going to do my
eyelids.
Okay.
And so you see how with that one product
I look a lot less tired
because my eye bags are a lot less
noticeable. The color around my eyes is
a lot less noticeable. Everything looks
the same color now.
We are going to add two more colors.
We're going to add a pink and we're
going to add a brown and they both do
specific things. So this product is
called a bronzer and it's going to add
warmth to my face.
So it's a brown. This is a a brown pot.
Um I actually like to take my finger
and rub the product until it gets soft
because it was pretty dry but with the
warmth of my finger it got soft.
» [snorts]
» And now I can place this on the high
parts of my face.
The high parts of my face are where the
sun
will naturally hit the face. If I was
outside, the sun would be shining down
on me like this. So that's the idea
behind
bronzer is that you want to put it on
the places that the sun would naturally
be hitting your face and it's supposed
to look
charming. It's supposed to give you
um a nat- a look of a natural tan. Okay,
so now I've added that with my fingers
and now I'm going to take
a brush to
blend that in. And this adds something
to the face that we call dimension. It
makes the face not look flat.
Like it's one one level. It makes it
look like, okay, when I turn my face
there's different
pigments. There's different ways that
the skin
shines in the light.
You're kind of like
an artist
making sure that from different views
your face looks
sculpted.
And so that's blended in now and I'm
actually going to add just a little bit
more to my forehead. I want to look a
little more tan.
Maybe a little bit more to my cheeks as
well.
So now my skin is looking a lot
healthier.
The next thing that I'm going to add is
blush.
Blush is a pink or a red color that you
add to your cheeks. You add to your
cheek bones so that it looks like you
have
a nice flush. You have
blood
that is at the center of your cheeks
which makes you look really healthy and
alive and youthful. It makes you look
young.
I like to add everything in dots because
then it's easier to
control
where it goes.
It looks funny at first until you start
blending.
The key with face products is blending.
Blending everything in
really well.
This is also
um a part of the face where the sun will
naturally hit the tops of your cheeks,
which might make them a little bit red.
You can see that I've added the pink
here
and here, and it's not very strong. Um
so, I'm actually going to add a little
bit more.
Cuz I want a stronger look.
I want it to look more pink.
Okay. Now you can see it a little bit
better.
So, with that, all of my face makeup is
done.
The next thing that I'm going to work on
is my eyes. My eyes are my favorite
feature and my favorite type of makeup
to do.
So, the first thing I'm going to do
actually is above my eyes, my eyebrows.
I want my eyebrows to look
tamed.
I want them to stay in place. I want
them to look brushed and I want them to
stay in place.
So, I take this eyebrow gel
and comb the hairs
upwards.
And the gel will make them stay in place
until I wash the makeup off at the end
of the day.
And I feel like already that makes my
face look
so much better.
The next thing that I'm going to put is
eyeshadow. I have this eyeshadow that
comes in a wand and I'm going to add the
color
to my eyelids.
It's a metallic
shiny [snorts]
pink color.
Dark pink.
A lot of eyeshadows come in a pan
and you pick up the color with a brush,
but this is a wand, so it's a lot easier
to use.
A brush to help make that look smooth.
Okay, so already my eyes are looking
really pretty.
So different from before.
Now, the next thing I'm going to do is
eyeliner. This is one of my favorite
parts.
This is a liquid eyeliner.
Um it's like a marker
and with this marker you can create a
wing.
We call this an a wing, an eyeliner
wing.
I first draw a line straight out and
then I connect it to
the lash line.
And then
I fill in
the wing.
And then I finish drawing
along
the lash line.
There you go. There's my wing.
Really difficult to do freehand, but
I've been doing it for many years, so
that's why I've gotten pretty good at
it. I'm going to do it on the other
side.
Align.
Straight out.
And then align back towards the eye.
Back towards the lashes.
Fill it in.
Fill in the wing.
And finish
the line above
the lashes. Really difficult to get them
to look exactly the same on both sides.
But they don't need to be perfect. They
just need to look good. So, I think that
did the trick.
I have my brown wing on both sides.
And now I'm going to use a pencil
eyeliner
on the bottom.
On the lower lash line,
I use pencil eyeliner instead of liquid
eyeliner.
That's like a marker. This is like a
pencil.
Okay.
So, now my eyes look really defined,
really big. The last thing is mascara,
which is for the lashes.
Mascara always has a wand.
And you take the wand,
um and you brush your lashes.
And when you brush your lashes, it
gets coated with
mascara, which makes your lashes look
thicker and longer.
And curled upwards.
This also makes your eyes look
bigger.
Do it on the bottom lashes, as well.
But just a little bit.
I'm going to dip it in one more time to
do the other eye.
When you're just learning how to do
makeup, sometimes you can really poke
yourself in the eye with
your eyeliner, with your mascara,
with your brushes, but eventually you
get better and you get used to it.
Okay.
So, my eyes are done and they're looking
really beautiful. It's really amazing
how much makeup can change how you look.
The last thing that I'm going to do is
Actually, I have two things. One thing I
forgot to add on my face makeup earlier
was highlighter,
which is like just a shiny
glowy
product, so that when you
turn your cheek, it catches in the
light.
Also makes you look really healthy.
You put that on the top of your
cheekbones. So, here you have a layer of
bronzer, blush, and highlighter.
Bronzer, blush, and highlighter. Those
three go together on your cheekbones.
And now for the last thing, lipstick. I
also really love lipstick. I kind of
have a problem collecting too many
lipsticks.
Here is a beautiful red lipstick. You
can see on the bottom that it has a
sticker that that shows you what color
it is.
And I'm going to twist up the tube, and
this is the bullet. This is called a
lipstick bullet.
» [snorts]
» And it's shaped this way so that you can
fit um fit the bullet onto your lips.
So, this is how I'm going to apply my
lipstick.
First, the top lip.
Then, I rub my lips together a little
bit.
Transfer
some color to the bottom.
And then, I'm going to add a little bit
more to the bottom.
And that came out great. Now, I have the
full face of makeup done.
One final step is to use something
called a setting spray.
You spray your face with, and it helps
your makeup stay on for the whole day.
So, you can sweat, you can be outside,
and your makeup should it should it
should last the whole day until you take
um you come back home and you take it
off. So, that's my last step.
And it dries really quickly.
Usually, because it has some sort of
alcohol in it. This is the finished
look, and so now I'm going to take off
my clips.
Fix my hair a little bit.
And
now, I have my full face of makeup done,
and now I'm ready to go out. You really
see how um makeup can change your
appearance, it can enhance your
appearance. It's It can be a form of
art. It feels a lot like painting like
an artist. It's a way to express
yourself, to you know, appreciate some
of your features, and um
yeah, to just have fun with with beauty.
And you definitely don't need all of
these products to enjoy makeup or to do
good makeup, but I've kind of grown my
makeup collection as I've started to
learn more about how to use these
different products. And
so I can choose which ones I want to use
on any given day and either make a
complete look like this or something
more simple. I usually don't wear red
lipstick every day for example. I don't
usually do winged eyeliner every day or
even a skin tint, but I might add a
little bit of mascara or a lip gloss or
some blush to my cheeks, right? So this
was just really fun to have you guys get
ready with me and I hope that you learn
some new beauty-related words in this
video and we'll see you next time.
Bye-bye.